How to lock your iPad
Lawrence Abrams
- April 7, 2010
- Read 322,791 times
As the iPad is a touch screen, there may be times that you would like to lock it so that you cannot accidentally start applications, or even more important, so your kids can't play with it. The iPad will automatically go to sleep and lock itself after 5 minutes of being idle, but there may be times that you would like to lock it immediately. This guide will explain how to lock your iPad, including the ability to have it prompt you for a password before it allows you to unlock the device and access the home screen again.
Locking an iPad is simple. Just press and let go of the On/Off/Wake/Sleep button at the top right of the iPad. This button can be seen in the image below:
iPad Lock Button image
Once you press the button the iPad will be locked, go into sleep mode, and shut off the screen. To unlock it, simply press the Home button and you will be at the locked screen as shown below.
iPad Locked Screen
Once the iPad is locked, you can unlock it by sliding the slider to the right. Once unlocked you will be at your home screen and can start using the iPad.
It is also possible to change some settings as to how your iPad locks and whether or not you wish to use a passcode to unlock it. To access these settings, tap on the Settings app. Once in the Settings app, and in the General category, tap on the Auto-Lock option. This will present you with a screen similar to the one below.
Auto-Lock time for the iPad
At this screen you can specify how long the iPad must be idle before it will auto-lock itself. The default time is 5 minutes, but you can set it to 2, 10, 15, or Never as well.
You can also set a passcode that must be entered before the iPad will unlock. To access these settings tap on the General Settings category again and then select Passcode Lock. This will bring you to a screen similar to the one below.
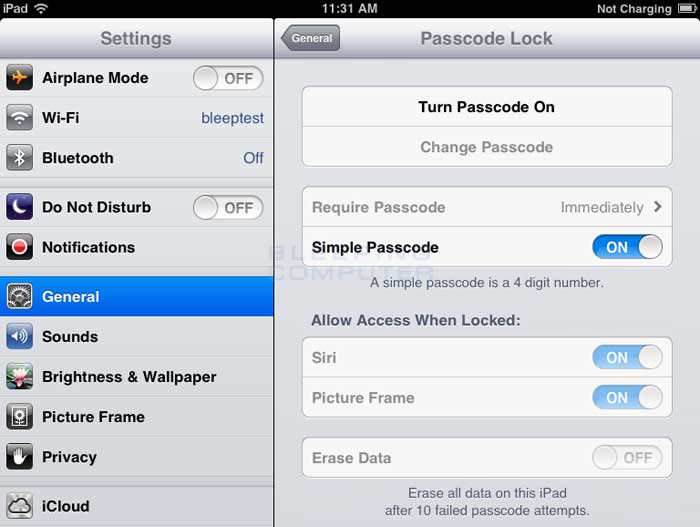
Passcode Lock screen
To enable the passcode, tap on the Turn Passcode On button and you will be at a screen asking you to input a passcode as shown below.
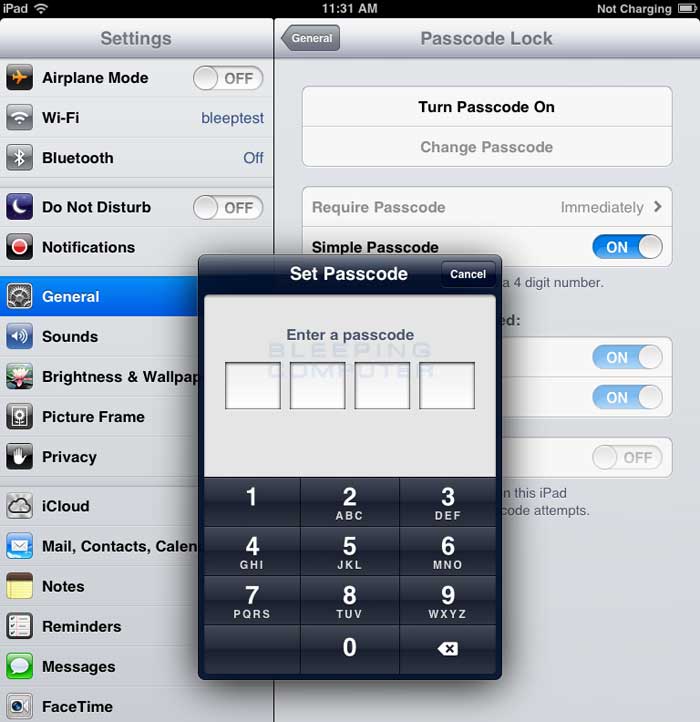
Set the Passcode needed to unlock the iPad
Enter your four digit passcode and then enter it once again to confirm it. Once you have entered the passcode that you wish to use twice, you will be shown the Passcode Lock screen with new options available to you.
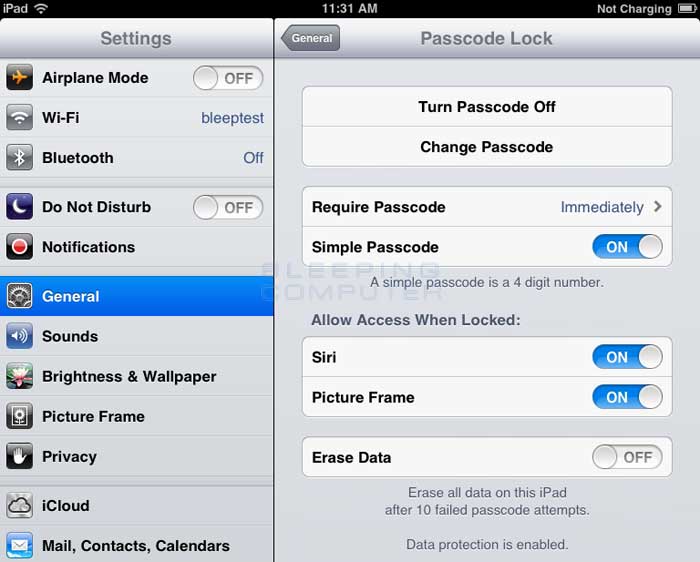
Passcode Lock options screen
These new options are explained below.
| Turn Passcode Off | This option disables the passcode requirement when you unlock your iPad. In order to turn passcode locking off you must know the current passcode. |
| Change Passcode | This option allows you to change the current passcode. In order to change the passcode you will need to know the current one. |
| Require Passcode | This option determins how much time after the iPad was locked will the iPad require you to enter a passcode to unlock it. For example, if this setting is set to 5 minutes, then if you attempt to unlock the iPad within 5 minutes of it being locked, you will not be prompted for the passcode. By default this setting is set to Immediately. |
| Simple Passcode | When simple passcodes are enabled, your passcode will consist of 4 digits. If you disable simple passcodes, then you can use any phrase or amount of characters that you wish for your passcode. If you disable this option, you will automatically be prompted for a new passcode to use. |
| Siri | If your iPad supports Siri, this options specifies if you wish to allow access to Siri while the device is locked. |
| Picture Frame | This option will turn on and off the ability to use the iPad as a picture frame while it is locked with a passcode. By default this setting is set to On, which means that while your iPad is locked you can still turn on the picture frame and view your pictures. Whether you consider this a privacy concern is up to you. |
| Erase Data | This option provides the ability to erase all of the data on your iPad if someone enters the wrong passcode 10 times. This will cause your settings to be reset to their original values and all of your information and media are erased by removing the encryption key to the data. By default this setting is set to off. |
On a last note, please be sure to remember your passcode because if you forget it you will need to reset or restore your iPad to remove it.
As always if you have any questions about this procedure, please do not hesitate to ask in the iPad forum.