Setting up a router VPN takes a bit of effort but it's well worth it. We explain how to install a VPN on your router, what the advantages are, and how to choose the right provider for the job.
If you’re looking to improve your online privacy, installing a Virtual Private Network (VPN) is a great way to get started. The problem is that most consumer VPNs have strict connection limits and usually only support the most popular operating systems. By setting up a VPN directly on your router, you'll be able to secure traffic from every device on the network, including PlayStation consoles, smart TVs, and Roku sticks. Best of all, you won’t have to configure each device individually; so long as they’re using your existing network, encryption will happen automatically.
Unfortunately, installing a router VPN is a little more complicated than simply downloading an app. Still, it shouldn’t take more than a few hours and there’s no denying the security benefits. We’ve put together a simple step-by-step guide to setting up and testing your router VPN so that the process is as straightforward and painless as possible.
A brief overview of router VPNs
VPNs work by sending your device’s data through an encrypted server. This prevents your Internet Service Provider and whoever owns the network from seeing which sites you visit. However, VPN apps only protect the devices they're installed on. In other words, to secure data from six devices, you’ll usually have to install the app and log in six separate times.
We can sidestep this issue by having the encryption happen after traffic reaches the router. This means you only set up the VPN once and can protect any internet-connected device, even if it doesn’t normally support VPN connections. For instance, you could play online games without revealing your real IP address, despite the fact that there are no VPN apps for games consoles.
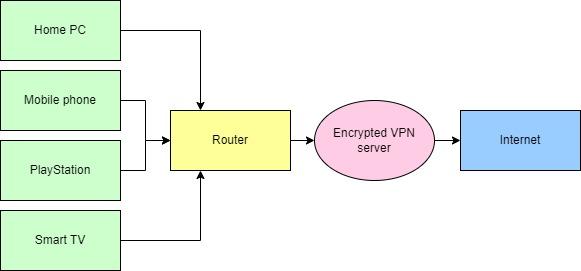
Traditional VPN apps sit between each device and the router. Installing a VPN on the router itself allows you to protect a greater range of devices and ensure they all use the same settings.
We should acknowledge that there are a couple of potential issues that put people off, though. First off, you'll have to be using router firmware that lets you configure a VPN connection. Don't worry: if yours doesn't (or if you’re unsure), we’ll reveal how to change this a little later. Also, switching between different servers won't be as seamless as when you're using a regular VPN app, since this requires you to adjust some of your router’s settings.
Finally, if a particular site blocks VPNs and realizes you’re using one, you won’t be able to access it on any of your devices. Luckily, all of these problems have solutions, as you’ll soon find out.
Your beginner-friendly guide to installing a VPN on a router
One of the things that make setting up a network-wide VPN tricky is that every router is different. Some support VPN connections straight out of the box, whereas others require users to flash custom firmware to unlock this functionality. To confuse things further, the options you need may have different names or locations across different versions of the same firmware.
Take a breath. Below, we'll walk you through the entire process from start to finish, addressing some of the most common issues people encounter along the way.
Step 1: Deciding which service to use
Before anything else, you'll have to sign up for a VPN. It's important that your chosen provider lets you download its servers’ UDP or TCP configuration files, as without these, you can’t use it alongside a router. It’ll also have to support the OpenVPN protocol, but the vast majority do.
We recommend NordVPN: it’s fast, reliable, and highly secure, plus it has 24/7 support and detailed setup guides for more than a dozen types of router firmware. Alternatively, you may want to try ExpressVPN, which has its own custom router app.
Note: while we’ll be using NordVPN in the screenshots below, the process will be effectively identical no matter which provider you choose. The only difference is that you’ll use your provider’s server address and configuration files instead of NordVPN’s.
WANT TO TRY THE TOP VPN RISK FREE?
NordVPN is offering a fully-featured risk-free 30-day trial if you sign up at this page . You can use the VPN rated #1 with no restrictions for a month - great if you want to binge your favorite show or are going on a short trip.
There are no hidden terms - just contact support within 30 days if you decide NordVPN isn't right for you and you'll get a full refund. Start your NordVPN trial here .
Step 2: Preparation
Visit your VPN provider’s website and navigate to the support section. Usually, there will be a button labeled “Help” or something similar at the top of the homepage. NordVPN users can scroll all the way to the bottom of the page and click Support Center under the Help heading.
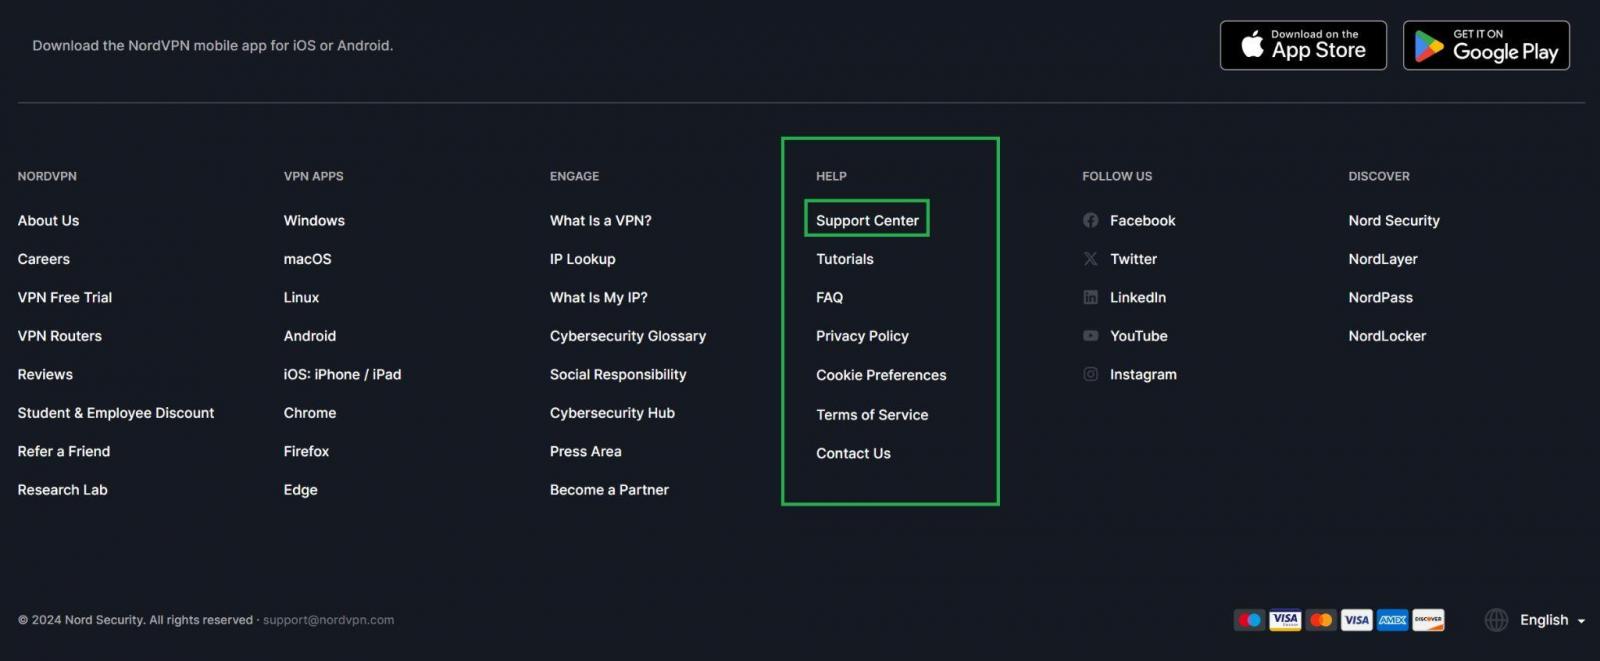
The first step towards getting the UDP and TCP config files is finding the support area. NordVPN’s is linked to in the footer on every page.
In the help section of the website, there’ll usually be a search bar. Searching for “config files” will almost always turn up what you’re looking for. In our case, it led to a short article called “How to find various configuration files” that linked directly to the files we needed.
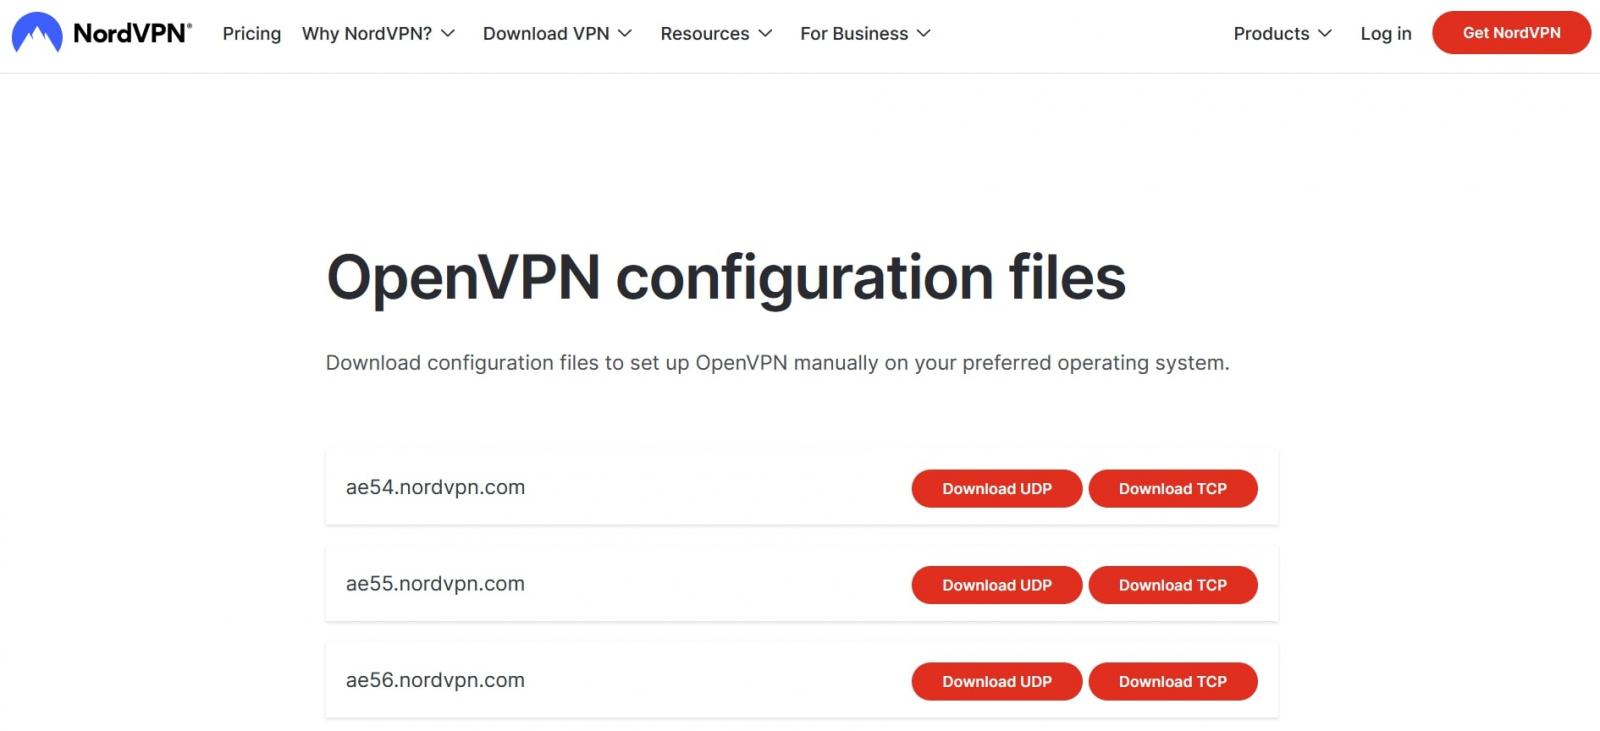
You can use either the TCP or UDP files. Generally speaking, UDP is faster and easier to set up, although TCP tends to be a little more reliable.
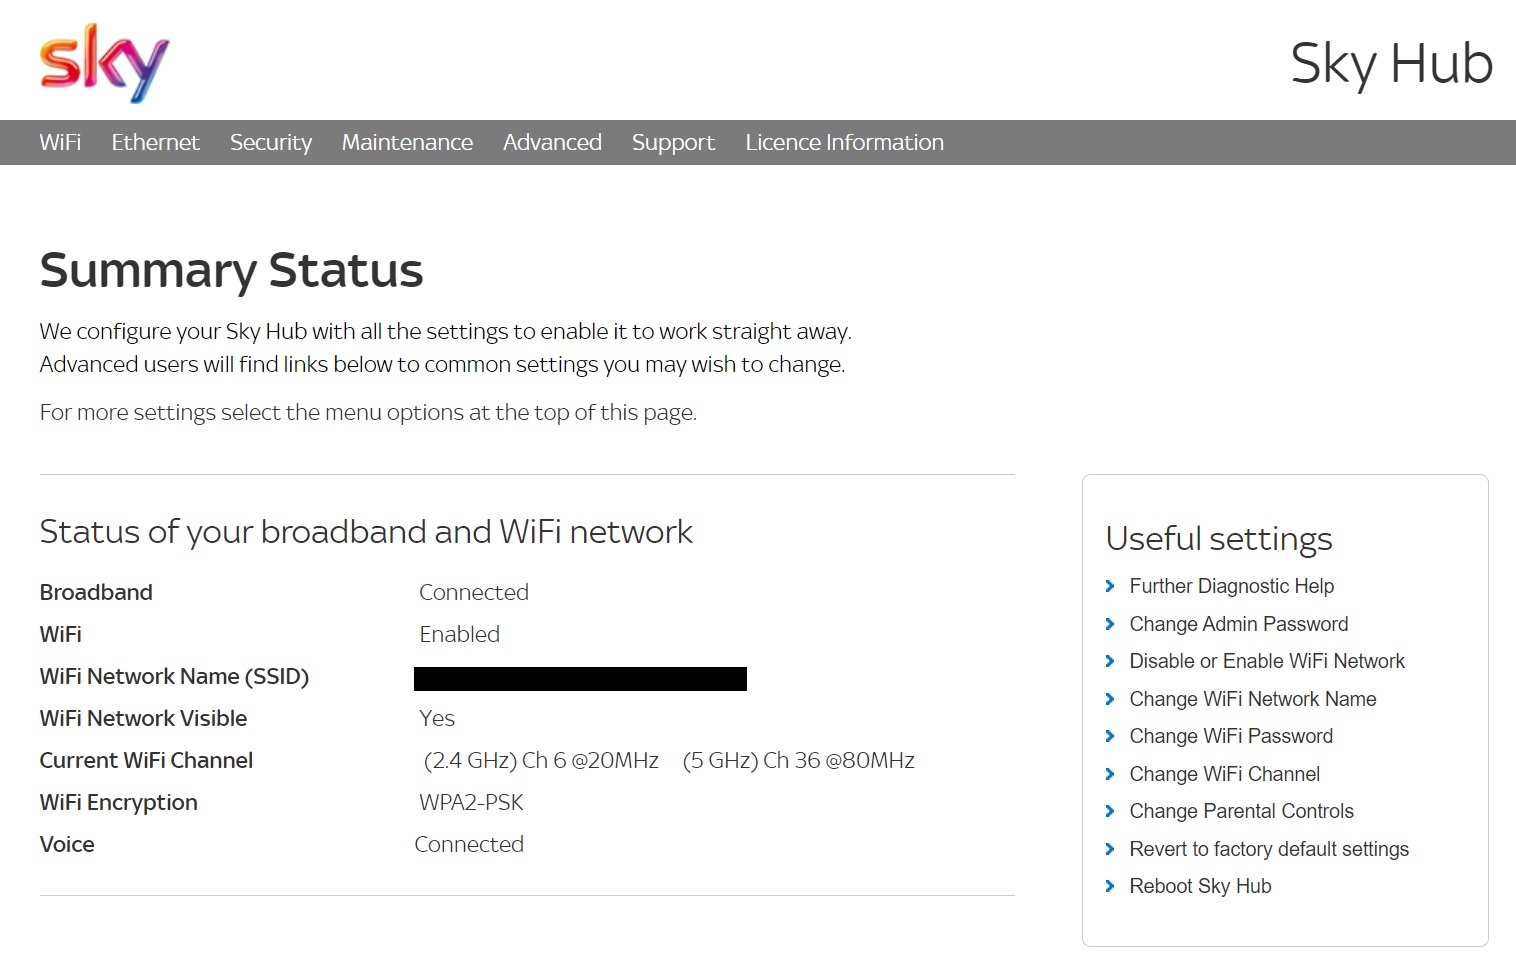
Choose a server in your preferred location and make a note of the server address (such as “ae54.nordvpn.com” in the screenshot above). Next, download the accompanying UDP or TCP file and save it somewhere memorable. We’d also suggest visiting an IP address-checking site like WhatIsMyIP and writing down the results; this will make it easier to check if our VPN is working as expected later on.
Step 3: Flashing suitable firmware
You may not realize it but routers have their own operating system, just like your PC does. This is called the router’s firmware. Some of the more common firmware types are DD-WRT, OpenWrt, and Tomato, all of which support VPNs by default.
If you're using the router that your broadband provider sent to you, however, there’s a chance it comes with proprietary firmware pre-installed. That's an issue because these tend to limit the amount of control you have over your router, and often restrict access to advanced settings. Luckily, it's fairly simple to install a different type of firmware instead – this is sometimes called flashing your router. However, be aware that doing so may limit the amount of assistance your ISP can provide if you run into any networking issues in the future.
Some Internet Service Providers put their own custom firmware onto routers. Normally, they don’t allow you to set up VPNs, meaning you’ll need to switch to a different type of firmware.
Once you've decided which firmware you'd like to use, visit the official website and download the most recent version. Next, connect your computer to the router using an Ethernet cable. You won’t be able to use a wireless connection during this process so this is a vital step.
Your firmware's website will have a detailed installation guide. Be sure to follow this exactly, since deviating from the plan can prevent the firmware from flashing correctly, or possibly even break your router. On the plus side, it’s usually just a case of finding an option called “Firmware Upgrade” or something similar and uploading the file you downloaded earlier.
Step 4: Configuring your VPN
It's finally time to start setting up the VPN. Visit your provider’s website and search the knowledge base for router installation instructions (NordVPN’s are here). If you're lucky, there will even be separate guides for different types of firmware. Essentially there are two parts to this process: changing your DNS settings and entering the details of the VPN server you'd like to use. There’ll also be a section for you to enter your VPN login details – double-check that you’ve typed these correctly because typos will prevent the VPN from working at all.
If your VPN doesn’t have a setup guide for your router firmware, proceed at your own risk. You could try following instructions for different firmware, but may find that options have slightly different names, or are in different locations. If you're in any way unsure about what you’re doing, we’d strongly recommend asking support staff for their assistance. They deal with issues like this every single day and will be happy to walk you through the setup process.
Once you’ve finished setting everything up, apply the changes and restart your router.
Step 5: Making sure everything works as expected
It's time to make sure that your VPN is functioning properly. The good news is that you don't have to change any settings on your devices – the WiFi details are still exactly the same, and only now everything on the network benefits from the VPN’s encryption.
Return to the IP address-checking site you used earlier. It should say that you have a completely different IP address from the one you noted down. You may even notice that the address seems to come from an entirely different country, depending on which server you use.
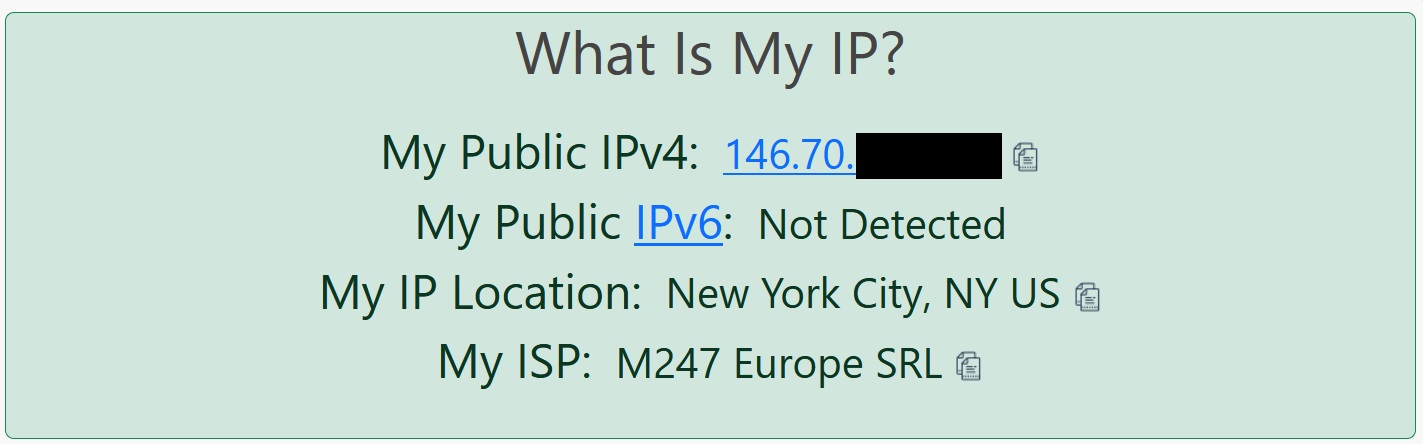
Once the VPN is installed on your router, all of your devices should return the same IP address. If you don’t notice any difference, it’s likely there was a mistake during setup.
If your IP address doesn't appear to have changed, don't worry. There are several possible causes for this problem and they're all relatively easy to resolve. Here are a few things to try:
- Clear your browser’s cache and cookies, then refresh the page.
- Restart your router and device.
- Log back into the router and make sure that the server information is correct.
- Check to see if there’s a mistake with the VPN login details.
- Use a different server.
- Revisit your VPN’s router setup guide and see if you accidentally skipped a step.
- Verify that you actually applied the changes in the router’s settings panel.
If none of the above fixes helped solve your issue, your best bet is to contact customer support. Routers and VPNs are fairly complex individually, and combining them only increases the number of things that can go wrong. However, in our experience, VPN support staff are friendly, responsive, and willing to take as long as needed to help you out.
Combining a router and a VPN: FAQs
How do I know if a router VPN is right for me?
There are plenty of reasons to install a VPN on your router but it's not the best option for everyone. For example, if you only use the internet on a couple of devices and these all support traditional VPN apps, there isn't really much of an advantage. In fact, running your VPN through your router would only make it more difficult for you to change servers and may prevent you from accessing some of the app’s more advanced features, such as ad-blocking or split tunneling functionality.
If however, you’d like to protect devices without native VPN support (say, an Xbox or Roku stick), router VPNs are your best bet. Plus, a router only counts as a single connection, even if there are hundreds of devices on the network. As such, this approach is perfect for anyone annoyed by their provider’s low connection limit.
Does my router support VPNs?
If your router is running popular firmware like DD-WRT or Openwrt, you'll be able to go right into the settings and start configuring your VPN immediately. It's always best to check first though; we recommend consulting your router's manual to see if it supports OpenVPN connections by default. If so, great! Some models, such as TP-Link's Archer series, even come with built-in VPN clients to help simplify things. If not, though, you’ll need to manually install VPN-friendly firmware before you can start securing your network.
Can I use any VPN on a router?
We strongly suggest doing your research before signing up for any VPN. That's because there are hundreds to choose from, and not all of them provide the configuration files required to install a VPN on your router. It also goes without saying that some services are faster or more secure than others, but there are other things to consider too, such as whether your provider allows torrenting, keeps logs, or is capable of beating strict digital censorship.
Generally, it’s best to stay away from free VPNs, since these tend to have very low monthly bandwidth limits and their servers are frequently blacklisted by popular streaming sites (meaning you’d be completely unable to access them on your home network). Luckily, the best VPNs all offer money-back guarantees, allowing you to try them out on your router and get a refund if you’re unimpressed.

Did you know
The following information is available to any site you visit:
Your IP Address:
Your Location:
Your Internet Provider:
BLEEPINGCOMPUTER RECOMMENDS:
Using a VPN will hide these details and protect your privacy. We recommend using NordVPN - #1 VPN in our tests. It offers outstanding privacy features and is currently available with three months extra free.

Post a Comment Community Rules
You need to login in order to post a comment
Not a member yet? Register Now