Want to see if your VPN is changing your IP address? Not all VPNs are reliable, so we recommend checking your VPN. We explain how to check your VPN IP address online.
Ever wondered if your VPN is working correctly? Want to be able to see your VPN for IP and DNS leaks – or just want to check that you are getting an IP address in the right location? In this guide, we explain how to check your IP address with a VPN.
A reliable VPN encrypts your web traffic and tunnels it to a remote server location. This conceals your IP address from websites and allows you to get an IP address abroad.
Unfortunately, many unreliable VPNs suffer from IP leaks. Other VPNs might give you an IP address in the wrong location. This is why it is important to subscribe to a high-quality VPN. It is also a chief reason why it’s a good idea to check your VPN IP address yourself.
In this guide, you will learn which online tool you should use to check your IP address. We will explain how to tell whether the VPN is leaking, and we will provide a few tips that can help your VPN work properly.
How to find your VPN IP address
It is easy to assume that a VPN is working as advertised, but it is worth checking that a VPN is operating correctly. At BleepingComputer, we only recommend VPNs that we have tested thoroughly. These VPNs do not suffer from leaks and use reliable protocols that have been proven to provide an IP address in the precise location selected within its app.
We understand that VPN users occasionally experience skepticism; particularly if they are connected to a VPN server that should provide access to a specific service – but is failing. If this happens, or you just want proof that your VPN is providing an IP address where you need it, we encourage you to run an IP check yourself.
Knowing how to run a VPN IP check is a basic skill all VPN users should possess. Best of all, testing your VPN IP only takes a few seconds.
How to check your VPN IP address:
- Connect to your VPN. You can connect to any location that you require.
- Wait for the VPN app to confirm that the connection has been established successfully.
- Navigate to Browserleaks to use its reliable IP-checking tool.
- Wait for the test to complete (remember to click Run DNS Leak Test if you also want to check for DNS leaks).
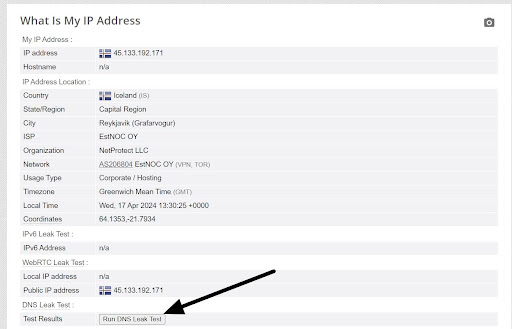
- Now that the test is complete you need to check the following sections of the test:
- IP address
- IPv6 Address
- WebRTV Leak Test
- Public IP address
- DNS Leak Test > Test Results
When you check each section, you should not see your home IP address. All of the results should appear in the location of the VPN server you requested in the app. If you can see your home IP address in any of the results, this means the VPN is not working correctly.
In the screenshot below, I’ve highlighted each test section you need to check. I carried out this example test from the UK, using a VPN server in Iceland. A successful result will only show results for Iceland.
If the test reveals my British IP address in any of the crucial sections listed above – this will mean that the VPN is not working correctly. Now, let's take a closer look at the results from my example test. This will allow you to become accustomed to what you need to look for:
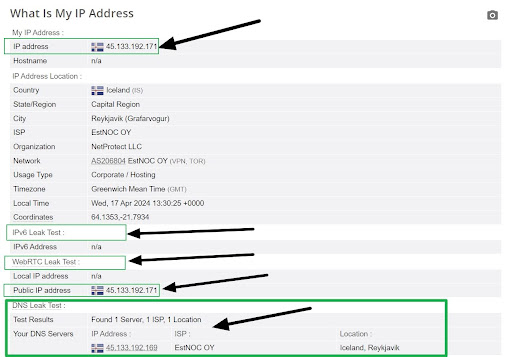
As you can see, all the highlighted results show an IP address in Iceland, or no IP address at all. This means that the VPN has successfully concealed my actual IP address and is giving me an IP address in the location I requested.
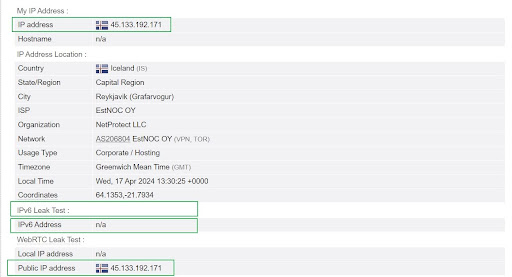
You may notice that some of the results are empty. This is nothing to worry about.
So, why are some of the results empty?
My ISP rents me an IPv4 address and I don’t have an IPv6 address. This is why this particular result came back empty. If you have an IPv6 address, then you will want to check that this section isn’t showing your home IP address.
If you see your real IP address under IPv6 Leak Test or IPv6 Address, this means that your VPN is suffering from an IPv6 leak. If this happens we recommend you disable IPv6 and revert to IPv4 only. We have provided instructions on how to do this later in this guide.
In my example test, the result for WebRTC Leak Test was also blank, because my browser was blocking WebRTC. If you see your home IP address in this section, then the VPN is suffering from a WebRTC leak.
What is a VPN IP leak?
An IP leak is a test result that shows your home IP address rather than the IP address of the VPN. If you can see your home IP address in any of the following test sections, this means that you uncovered an IP leak:
What is a DNS leak?
A DNS leak is a test result that reveals a DNS server that doesn’t match your VPN’s IP address.
When you use a VPN, your DNS requests are proxied to the VPN’s servers inside of the securely encrypted tunnel. As a result, your ISP can no longer see your DNS requests.
This means your DNS requests are being handled privately, and your ISP has no way of knowing what websites you are visiting.
If your DNS Leak Test shows an IP address that belongs to your Internet Service Provider, then the VPN is suffering from a DNS leak. This makes the VPN unsuitable for privacy purposes.

The results from my example test were successful because I only detected an IP address in Iceland registered to the Internet Service Provider EstNOC OY.
My ISP is VirginMedia in the UK, which means these results are safe.
What is a WebRTC leak?
A WebRTC leak is a type of vulnerability caused by the Web Real-Time Communication protocol. This kind of leak is dangerous because it can expose your real IP address when using a VPN.
WebRTC is a technology built into most web browsers, including Google Chrome, Firefox, and Edge. The protocol allows certain applications to establish a peer-to-peer connection for voice and video chat purposes.
If you notice your home IP address in the result for WebRTC Leak Test, then your VPN is leaking. This is bad news because websites can track your actual IP address.

A successful WebRTC leak test should come back empty (as in the screenshot above) or match the IP address of your VPN server. As long as the test is not showing your home IP address, the result is nothing to worry about.
If you detect a WebRTC leak, we recommend checking whether your VPN has a browser extension designed to block WebRTC. Alternatively, you could try disabling WebRTC in your browser settings.
If the problem persists after consulting your VPN provider, we recommend switching to a more secure VPN service. The best VPNs do not suffer from WebRTC leaks and do not require you to disable WebRTC (which can be frustrating if you use apps or services that require the WebRTC protocol).
What does it mean if a VPN IP check reveals a different location?
A VPN IP address check should provide results in the location of the server you connect to in the app. If, for example, you connect to a VPN server in the US, but detect an IP address in the Netherlands (or some other country), then the VPN is not working properly.
A VPN should provide you with an IP address in the requested location, otherwise, you won’t be able to use region-locked internet services from that country.
If you are worried that the server you’re using isn’t working to access regional services, we recommend running the VPN IP check described in this guide.
If your VPN is successfully providing an IP address where you need it, but still isn’t working with the service you require, then the service might have blocked the IP address you’re using. Many VPNs have already been blocked by Netflix, for example. If this is the case, you may need to switch to a different server or an alternate VPN provider.
The VPN’s customer support should be able to tell you whether the VPN works to access the service you are interested in, and which server to use.
How to disable IPV6
If you detect an IPv6 leak when testing your VPN, we recommend reverting to IPv4. All IPv6 addresses can be downgraded to IPv4, so you can bypass this leak yourself simply by switching IPv6 off:
Windows:
- Open your Control Panel and click on Network and Internet.
- Click on Change adapter settings.
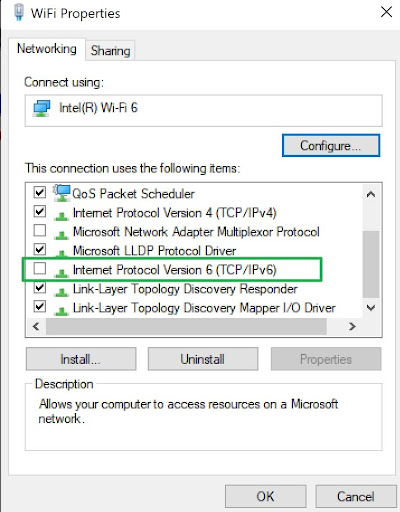
- Right-click on your active network connection (WiFi or ethernet) and select Properties.
- In the networking tab, uncheck the box next to Internet Protocol Version 6 (TCP/IPv6) to disable it.

- Click OK to save changes and close the window.
- Restart your computer to ensure the changes take effect.
macOS:
- Navigate to System Preferences > Network
- Choose your active network connection from the list on the left (WiFi or Ethernet) and select Advanced.
- Click the TCP/IP tab and set Configure IPv6 to Off.
- Click OK and then Apply to save your changes.
What is my home IP address?
Your home IP address is the official address provided by your ISP, and is normally assigned to your WiFi router and all the devices that connect to it. This is the address needed to communicate with the outside world. Without it, websites won't know where to send your data back.
When running a VPN IP check, it is important to know what your home IP address is.
We recommend that you make a note of your home IP address before running the checks described in this guide. This will make the process easier.
To find your home IP address you can run the same test described in this guide, However, you should run the test without connecting to the VPN. Be sure to make a note of both your IPv4 and IPv6 addresses if they are available.
With your home IP address details noted, you can run the VPN IP tests confidently. Your home IP address should not appear anywhere in the results while connected to the VPN.

Did you know
The following information is available to any site you visit:
Your IP Address:
Your Location:
Your Internet Provider:
BLEEPINGCOMPUTER RECOMMENDS:
Using a VPN will hide these details and protect your privacy. We recommend using NordVPN - #1 VPN in our tests. It offers outstanding privacy features and is currently available with three months extra free.

Post a Comment Community Rules
You need to login in order to post a comment
Not a member yet? Register Now